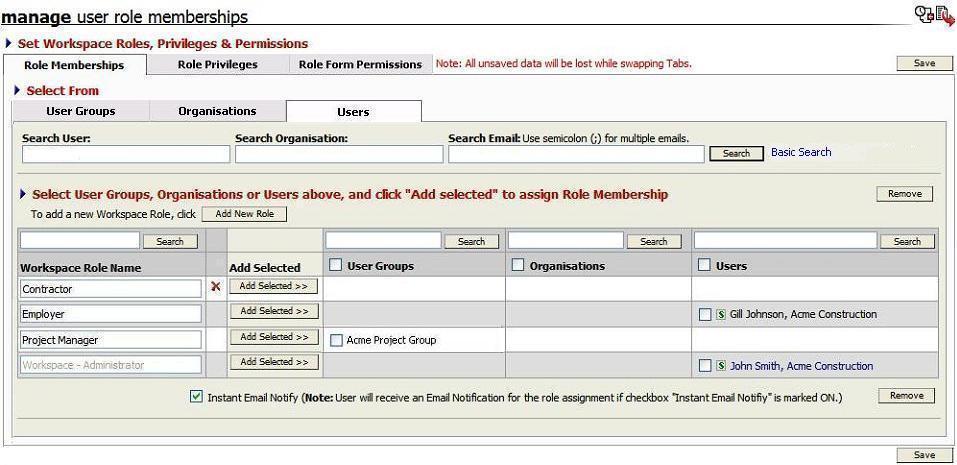
Privileged Workspace / Workspace Template Administrations will be able to create new roles and assign roles to Users / Organisations / User groups within respective workspace or workspace template using " Manage User Role Membership" option.
Administrators will be able to define the workspace or workspace template privileges and form permissions for single or multiple roles.
![]() Users
with Assign Role
Membership – All Orgs privilege can assign workspace
Roles to the all the Organisations or the users of all the Organisations on the Workspace
Users
with Assign Role
Membership – All Orgs privilege can assign workspace
Roles to the all the Organisations or the users of all the Organisations on the Workspace
![]() Users with Assign Role Membership – Own Orgs privilege can assign workspace Roles to users of own Organisation
on the Workspace.
Users with Assign Role Membership – Own Orgs privilege can assign workspace Roles to users of own Organisation
on the Workspace.
1. Select "Manager User Role Memberships" option from Admin menu
![]() Click on the Delete
Click on the Delete ![]() icon
against a role. Click on “Save” button to save the changes.
icon
against a role. Click on “Save” button to save the changes.
2. Click on Add New Role button
![]() Specify the Role name,
Specify the Role name,
![]() Click on “Save” button to save the new Role.
Click on “Save” button to save the new Role.
3. Manage Role Privileges:
![]() Click on “Role
Privileges” Tab.
Click on “Role
Privileges” Tab.
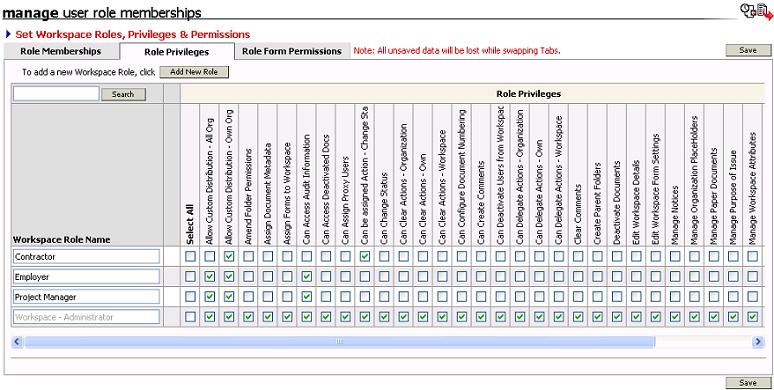
![]() Search for required
Role.
Search for required
Role.
![]() Select required
Role privileges and click on “Save” button.
Select required
Role privileges and click on “Save” button.
4. Managing Form Privileges
![]() Click on “Role
Form Permissions” Tab
Click on “Role
Form Permissions” Tab

![]() Search for required Role.
Search for required Role.
![]() Select required form permissions and click on “Save” button.
Select required form permissions and click on “Save” button.
5. Assign Users to the role.
![]() Click
on "Users" Tab
Click
on "Users" Tab
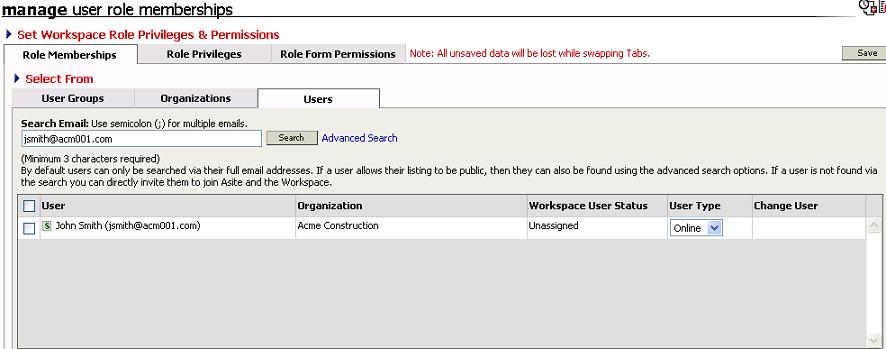
![]() Search for multiple emails in Basic Search which need to assigned
to the role.
Search for multiple emails in Basic Search which need to assigned
to the role.
Only those can be searched via their full email addresses, if Team member has selected By Email Only - Allow me to be found by people who know my email address in User Search Privacy Options
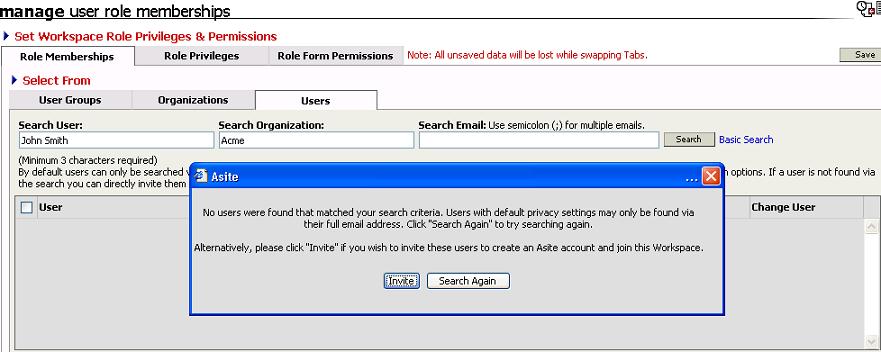
Click on "Advanced Search" and search the users by their name or organisation if User Search Privacy setting has been set to Public in their User Account Profile.
Below message will be displayed if the User Search Privacy setting has been set to Private in the User Account Profile.
Click on Invite if you wish to Invite these users to create an Asite Account or join to the workspace
![]() Check the box and Click on Add
Selected button to assign the selected User to the required
Workspace Role.
Check the box and Click on Add
Selected button to assign the selected User to the required
Workspace Role.
![]() Click on “Save”
button to save the membership assignment.
Click on “Save”
button to save the membership assignment.

![]() Once the Team Member is assigned to the Workspace Role, it will
display in Italics as the Invitation is not accepted yet.
Once the Team Member is assigned to the Workspace Role, it will
display in Italics as the Invitation is not accepted yet.
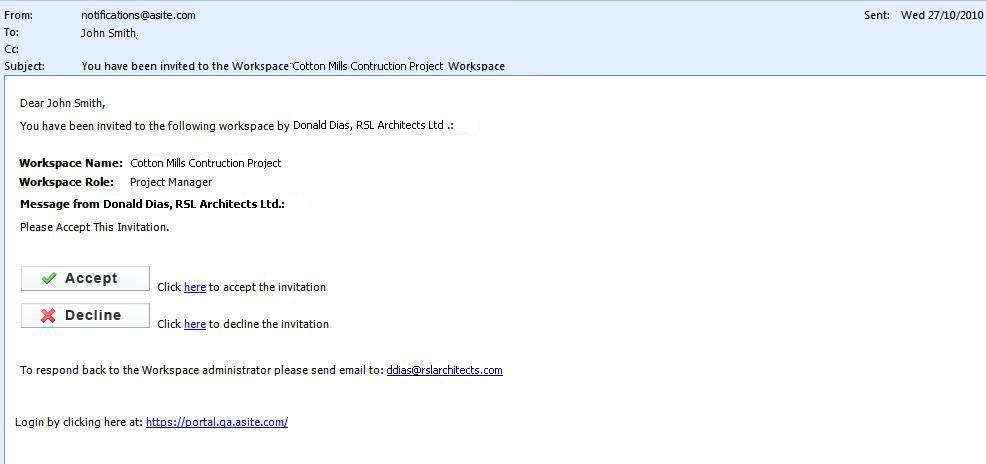
![]() Invitees are sent an email invitation with
a link to accept or reject the invitation to join the workspace.
Invitees are sent an email invitation with
a link to accept or reject the invitation to join the workspace.
![]() Once the invitation is accepted,
you will be able to access the project.
Once the invitation is accepted,
you will be able to access the project.
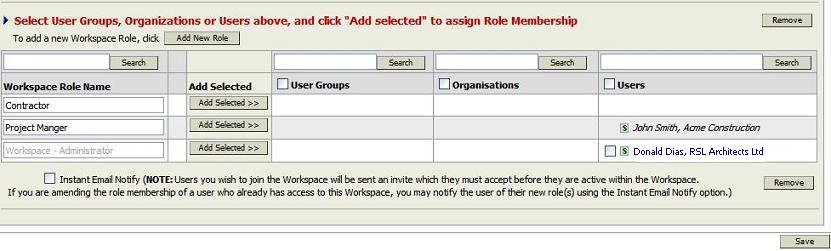
6. Assign User Groups and Organisation to the role
![]() Click on "Role Memberships" Tab
Click on "Role Memberships" Tab
![]() Click on "User Groups"
Tab to select available User Groups / "Organisation" Tab to
select an Organisation
Click on "User Groups"
Tab to select available User Groups / "Organisation" Tab to
select an Organisation
![]() Search for required User Group
/ Organisation and Click on Add Selected button
to assign the selected user group /Organisation to the required
Workspace Role.
Search for required User Group
/ Organisation and Click on Add Selected button
to assign the selected user group /Organisation to the required
Workspace Role.
![]() Invitees are sent an email invitation with a link to accept or reject
the invitation to join the workspace.
Invitees are sent an email invitation with a link to accept or reject
the invitation to join the workspace.
![]() Click on “Save” button to save the membership assignment.
Click on “Save” button to save the membership assignment.
7. Remove Role Membership
![]() Select the User
Group, Organisation or User to remove from Role.
Select the User
Group, Organisation or User to remove from Role.
![]() Click on “Remove”
button and a validation prompt will be displayed.
Click on “Remove”
button and a validation prompt will be displayed.
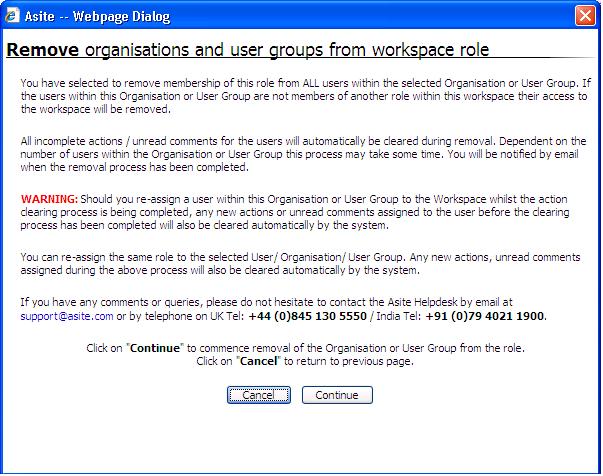
![]() Click on ‘”Save” to confirm the removal of Organisation / User Group
/ User.
Click on ‘”Save” to confirm the removal of Organisation / User Group
/ User.
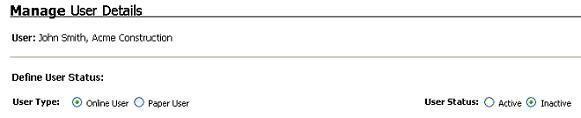
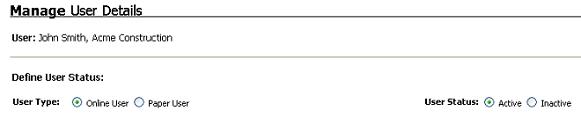
8. Inactivate User:
![]() Search for users to change details
Search for users to change details
![]() Click on "Change User Details"
button.
Click on "Change User Details"
button.
![]() Select "Inactive" button to inactivate the active
user
Select "Inactive" button to inactivate the active
user
![]() Click
on Submit
button
Click
on Submit
button
![]() A new page will be displayed with the list incomplete actions and
unread comments on
A new page will be displayed with the list incomplete actions and
unread comments on
documents & forms

![]() Click on the
Click on the ![]() to clear
the incomplete actions for the users as displayed and then clear
to clear
the incomplete actions for the users as displayed and then clear
the actions as per the steps in Clear Action on Documents &.Clear Action on Forms
![]() Click on the
Click on the ![]() to delegate the incomplete actions to other recipients, refer Delegate
to delegate the incomplete actions to other recipients, refer Delegate
Actions on Documents & Delegate Actions on Forms
![]() Click on the
Click on the ![]() icon to
clear the unread comment as per the steps in
icon to
clear the unread comment as per the steps in
9. Activate User
![]() Search for users to change details
Search for users to change details
![]() Click on "Change User Details"
button.
Click on "Change User Details"
button.

![]() Select "Active" button to activate an inactive user.
Select "Active" button to activate an inactive user.
![]() Click on Submit to save the settings.
Click on Submit to save the settings.
![]() Assign Proxy users for Paper users.
Assign Proxy users for Paper users.
Note:
1. The user who is assigned multiple roles, will get a union of privileges of all roles.
2. Administrators will be now be able to assign additional users to same roles when “All Workspace Roles (inc privileges) with inheritance is selected”.
FAQs:
Q. I want to edit the Workspace – Administrator role name but it is disabled for editing?
A. Workspace – Administrator role is a system created role and therefore not available for editing. Same is the case for Tender Administrator role within Tender Manager and Workspace Administrator within Procurement Manager too.
Q: I do not see Delete icon beside some of the roles in the list.
A: Delete icon is not displayed for the roles which have already been assigned to atleast one of the users, organisations or user groups.
Useful Links:
Clear Incomplete Actions and Unread Comments